Apr 192023
 

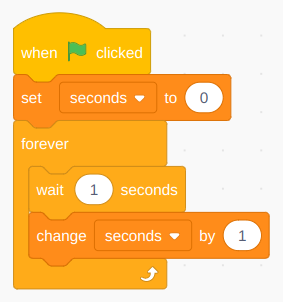
Activity 1 – explore a database

  • In j2launch, click on j2data  
  • The database 
  • Then examples 
  • Look at some of the different databases: dinosaurs, Titanic passengers, countries or minibeasts.
  • Look at the different tabs:
    • Define – how it is set up – each category of information is called a field
    • Form – is like a record car or top trump that contains all of the information for one record – this is how you add a new tiem in the database.  You can order and search the records.
    • Table – you guessed it – lists the information in a table – good if you want to see it all at a glance.  You can sort the data by clicking on column headings.
    • Chart  – allows you to draw graphs comparing the data of all the items.  Only useful if records have numerical (number) data.   You can alse use the search to restrict results to items containing that search word.
    • Options
  • What can you find out from searching, ordering or drawing graphs of the data?  Have a go at answering these questions: enter your answers in theis Google form

 Countries

  • Which is the smallest country? (Form tab, Sort by area)
  • Which has the second lowest population (Form tab, sort by population)
  • What is the 10th country  in alphabetical order (Table tab, sort by name row by clicking on Country Name)
  • Do big countries have big populations (Chart tab, options below with scatter chart)
  • Ask and answer your own question

Dinosaurs

      • What is the longest dinorsaur?
      • Which are the first dinosaurs?
      • What proportion were carnivores? (pie chart)
      • Ask and answer your own question.

Minibeasts

      • How many have more than 6 legs?
      • Ask and answer your own question.

Titanic passengers

      • How many people survived?
      • Who was the youngest survivor? (I’ve met her!)
      • Roughly what fraction of men survived?  What fraction of women survived?  (chart – see options below)
      • Ask and snawer two questions of your own.

Activity 2 – Plan your database

  • Think of a topic that you could make a database about:
  • Good examples are
    • animals from a particular habitat or family, eg birds of prey, whales, Amazon animals
    • sportspeople eg from a partiular sport
    • geographical – countries, cities, rivers, mountains
    • engineering – buildings, bridges, ships, cars
    • It may involve research – reading books, searching for information – find one good website
    • You will need at least 20 records and 5 fields (pieces of information) – 3 of them numbers/dates
    • Something you could find interesting informations, patterns by asking questions of your database.
  • What fields will you need?

  • Start a new database
  • Add fields in the Define tab
  • Don’t forget to save frequently.

Activity 3 – Populate your database

  • Add new records and fill them in.
  • Read up or research to find more records and inforamtion.
  • Try and get as wide a range of items on the topic as you can.
  • Don’t forget to save frequently.

Activity 4 – interrogate your database

  • Think about some questions you could find out about your database.
  • Create a j2e5 page with questions and the answers that you found from your database.
  • Can you copy graphs and charts from your database to j2e?
Mar 232023
 
  1. Use your Scratch Games Toolkit project (hide some spirtes) or start a new project

1 Main character movement

  • For platform game, use 4, 6 and 7
  • For two player game, add another sprite with different key controls

2 Add obstacles and/or baddies

  • Moving baddies 8, 13, 14
  • Make character react to baddy: 9
  • Could also have stationary baddies to avoid touching

3 Next level / game over

4 Coins / lives / points

Mar 152023
 
  1. Start a new project (or save a copy of your test project)
  2. Come up with an idea for a game called “Blackout” about a city in the Blitz – think of:
    • The aim – work through levels, get to as many houses and black them out,
    • what characters and backgrounds you will need – main character, enemies – ARP, spies, dogs,
    • controls – keyboard, mouse, 1 player/2 player
    • lives, coins, points, timed
    • levels
  3. Use blocks from Scratch Games Toolkit

Week 1:

  • Make spirtes – characters, doors, coins, movin objects….,
  • Make backgrounds – intro screen, game over, levels
  • Add variables for points, lives
  • Add messages for game states
  • Code ontrols and movement – ketboard controls, gravity, jumping….

Week2:

  • Code interaction between sprites
  • Losing lives, gaining points, changing levels
Mar 092023
 

Task 1 – Sign in to class account

  1. Go to Scratch
  2. Sign in: SM-Pine23 SM-Spruce23 SM-Willow23 (listen for the password)
  3. Then “Create”. “File – Load from your computer”
  4. Load your file from ast time, saved in Google Drive
  5. Rename your project with just your name

Task 2 – Games toolkit project

  • Finish working through Scratch Games Toolkit so your project includes everything on it
  • You will need different sprites and some different keyboard controls

Task 3 – Customise

  • We are going to create a game called “Blackout” about WW2 in the Blitz. Make sprites and backgrounds in your Gaems toolkit project suitable for this theme
  • You could:
    • edit existing sprite costumes
    • draw your own
    • search for images to use, save then upload into sprite costumes
  • WARNING – if you get rid of a sprite, it gets rid of all the code too. So just add and remove costumes, not whole sprites.
  • Some ideas: ARP warden, boy/girl character (could be same sprite and player decides who to play as), doors, ration book, houses, cars, street lights, …
Feb 232023
 

Character movement

1 Walking animation

2 Follow mouse

3 Keyboard controls (up down left right arrow keys)

For a maze: change each one like this:

(If it bmps into the wall, it bounces back in the opposite direction)  Same idea works for other movelment controls.

4 Keyboard controls (left-right)

5 Keyboard controls (forward and steer)

6 Jump

7 Gravity and platforms

Baddies

8 Follow a set path

Drag the sprite to each point before you choose each block

13 Random falling ovjects


14 Randomly timed objects

9 Sprite reacts to another sprite

I’ve made mine hide, but you could go bck to start, lose a life, score a point…

Next level/ game over

10 Door to next level


11 Game over

Coins / points / lives

12 Collect coins

15 Timer 

Challenges

  1. Theme your project for a game called “Blackout” bu changing costumes and backgrounds.
  2. Come up with an idea for a game about the blackout – think of the sim, what characters and backgrounds you will need, controls, 1 player/2 player, lives, coins, levels, points, whether it is timed,
Jan 022023
 
  1. 5 minutes of touch typing
  2. This term’s project big picture
  3. Learning journey
    • Look at boxes
    • Nets
    • Researching box styles
    • creating nets
    • Decorating in 40’s style
    • cutting, scoring and gluing box

1 Look at boxes

  • What makes it interesting?
  • Why is it that shape?
  • How many sides? What shapes?
  • Does it have a lid?
  • How does it open?

2 Explore nets

  • Goto Polypad (one of the Mathigon tools)
  • Drag out some 3d solids and unfold them to see their nets. This only shows one net – there are different nets for the same 3d shapes.
  • Create your own nets by dragging out 2d shapes then selecting and folding to make 3d shapes.
  • Do a Google image search for “3d shapes nets”. Copy and paste useful examples to a j2e5 page.

3 Research WW2 boxes

  • Search for example of boxes from WW2 times
  • Copy and paste useful examples to a j2e5 page

4 Creating nets

  • Decide on a box shape
  • in j2e5, create the net with gluing tabs
  • if in doubt, include a tab – you can always cut it off if you don’t need it
  • Make sure shapes are exactly sized and positioned – very small mistakes will mean your net doesn’t fold up.
  • include your name on the page

5 Create box design – draw shapes, write and style text

  1. Look at your research into 19040s boxes
  2. Write the text for the box
    • company, product name, slogan, information….
    • make it realistic (but you may need to make it up)
  3. Choose fonts and colours
  4. Draw graphics
    • background, stripes, shapes, logo
    • You are designing it, so no Google images

Sucess criteria

  • Name on sheet
  • Save as “P2P…..box” or “S2P….box” or “W2P….box” (Pine/Spruce/Willow to print)
  • Get rid of any spare pages – it should be just one page
  • Accurate box net
  • Gluing tabs
  • Product name and company on most sides
  • Adveritsing slogan
  • Information
  • Logo or simple shapes/colours
  • Fonts and colours chosen carefully
  • Net filled in a colour (unless it is white) – not whole page coloured

6 Cut, score, glue final box

  1. Cut out

Finished?

  • Check success criteria carefully
  • Go to iLearn2 login page
  • Login with code on the whiteboard
  • Work through the unit using Google Slides

2023 Boxes

Sep 152022
 

Typing.com

Africa book covers

  1. Go to “my files”, “shared files”, your class folder
  2. Look at the different book covers
  3. Move the cover you are doing on to the first page.
  4. Use the tools in j2e to copy one of them as accurately as possible.

Decomposition

We will start with the cover background colour and build it up in layers.  Break the problem down – decomposition

1 Cover shape, blocks and colour

  • Trace the shape of the whole book cover with the rectangle tool
  • Do the same for the red bar at the bottom
  • Select each shape and change the colour by using “fill”

2 Text

  • Type the different bits of text
  • Choose the best font
  • Resize and position them exactly on the book cover

3 Shapes

  • Use the “spiky” shape tool or other shape tools to trace around the any other shapes.
  • Change the fill and outline colour

4 Images

  • Search for images using several key words – search what you see
  • Use this website to take the background away in you need to
  • OR
  • Search for the picture and drag onto j2e
  • Go to JIT5 paint
  • Start a new painting with the checkerboard background
  • Put the picture on the page
  • Fill any white backgound with “invisible paint”
  • Save image as gif (top right of image)

6 Improve the text

Finished?

  1. Start another contrasting book cover.  What different skills do you need?
  2. Recreate 3 contrasting book covers
  3. Choose one book cover – create the back cover and spine in the same style, matching colours, fonts etc
  4. Create your own book cover on Africa or an aspect of Africa.